Repairing Saitek Pro Flight Switch Panel with Arduino
The Saitek Pro Flight Panels were awesome. I bought all of them years ago and they worked great… with Windows 7 and USB 2. Unfortunately when I upgraded my computer everything stopped working due to Windows 10 and all USB3 ports. I have followed every guide, every driver, every bios setting I could find and I can’t get any of the panels to function. I’ve been able to get the radio panel and multi panel working with Spad.NEXT but the switch panel refuses to function. I can only assume something on the circuit board has gone bad. Now that Logitech has bought Saitek this thing is basically a brick with no support. Really without Spad.NEXT all three would be bricks as the Logitech software does not work at all. I really want my simulator to work again so I set off to figure out how to fix switch panel.
TL:DNR – Check out my video of it in action and view the code on github
Read on to see how I did this.
I looked into how to use an Arduino as a HID device and I found that the Leonardo has built in HID capabilities. I picked up a couple of Pro Micro clones from Amazon and went to work. First step was to remove the old circuit board. I just cut all wires and removed circuitry. Very easy with this panel.

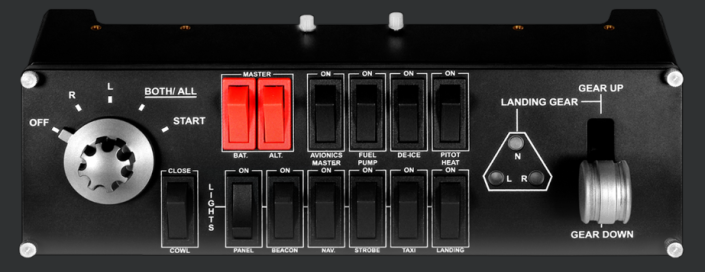
Next step is to remove all wiring, cleanup the contacts, and add ground wires for the gear and magneto switches. The main and light switches are simple switches, the gear lever is a 2 position switch, and the magneto is a 5 position switch. The gear/magneto switches were grounded to the old circuit board so I connected them to the button ground wire already there.


All of these switches make for 20 I/O points which is two more than the pro micro has. Luckily the gear lever only needs 1 of the 2 positions connected to act like a standard switch. That left one missing input so I didn’t connect the cowl flap switch. Every other switch works. The LED’s on the landing gear also had to go. If I decide to go after the cowl switch and LED’s later I can upgrade to this board but it is more expensive. May not be worth it

I wired up a few of the switches to test everything out and everything was working as expected. Using the pro micro as a HID Keyboard was incredibly easy and the code was so simple it didn’t take long to get everything hooked up.
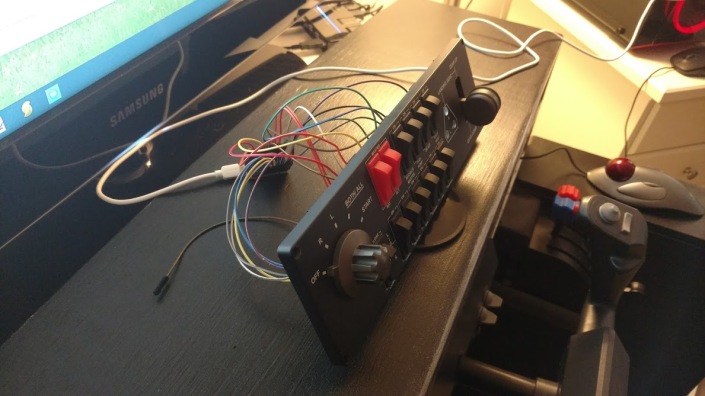
Finishing it up required some modifications to the back cover to fit the wires. After modification (basically removing the screw standoffs and increasing the wire hole) it went together easily and is working great.
I’m really pleased with this evening hack that netted about 95% of the functionality of the switch panel back. I no longer have to worry about Saitek/Logitech screwing things up as now it’s up to me to do so :). All code and info can be found on my github here
https://github.com/CountDeMonet/SaitekSwitchPanelArduinoReplacement

March 11, 2019 at 6:06 am
Hello, i am very very very light in soldure ;=) so could you add a photo with the wiring on the Pro micro? thanks from and old guy ;=)
regards
March 11, 2019 at 10:31 am
I don’t think I have a picture of that actually. It’s inside my simpit now. The wiring on the promicro was easy though and which pin each wire goes to is in the top of the code
https://github.com/CountDeMonet/SaitekSwitchPanelArduinoReplacement/blob/master/SaitekSwitchPanel/SaitekSwitchPanel.ino
The pro-micro is powered through the usb port so there is nothing special to do for power. All of the wires on the micro go to the switches. There is one ground to the entire thing if you look at the pictures in the thread . You will have to solder headers onto the pro micro to complete this task and new wires need to be soldered onto the switches.
March 11, 2019 at 11:27 am
Merci de votre réponse,
So i suppose you use the A0 to A3 for 18 to 21 but for the 0 and the 1 I dry ;=)
For info I use FlightMap and unfortunately you are like a lot of developers taken hostageâ¦â¦.
Regards
March 11, 2019 at 11:43 am
Here is a good pinout on the pro micro. https://cdn.sparkfun.com/assets/9/c/3/c/4/523a1765757b7f5c6e8b4567.png
I had to use every arduino pin available 🙂
Thanks for being a flightmap user. It was a sad day when I had to shut it down.
March 13, 2019 at 9:36 am
Hello,
So i go with your project, waiting materials ;=)
But: ….
I know nothing with arduino programmation and when i try to copy and paste ce code you write on arduino program i have error with the keyboard not present ??
Can you give me a ino file for i understand what i have to put only because when i erase all ligne with keyboard no error on arduino program??
Perhaps because nothing is plug for the moment ??
Thanks by advance
Regards
March 13, 2019 at 10:14 am
you shouldn’t need to copy and paste anything. once you download the repository from github extract it and then open the SaitekSwitchPanel.ino file in the arduino ide. https://www.arduino.cc/en/Main/Software
The keyboard.h file is a standard arduino library. There should be nothing external required to compile and upload this to the pro micro. When you open the Arduino IDE software, pls go to the tool and choose the board “Arduino Leonardo” as well. That selects the type of board you are compiling for which may change which libraries are available.
May 12, 2019 at 2:20 am
Hi Eric, Still using and loving your FlightMap software, definitely the BEST out there. As for the Saitek panels. I am running latest computer with latest windows 10. I do have 1 usb 2 port but not using that as I have the saitek panels, all 5 (yoke,throttle,switch panel, Radio Panel, Multi Panel) plugged into a hub running on usb3 port BUT I use SPAD.NET in ADMINISTRATOR mode, which removes the hid usb control of windows re the power supply control.
May 12, 2019 at 5:22 pm
I was able to get the other saitek things working with SPAD.net but for some reason the switch panel just wouldn’t work. My PC has no USB2.0 ports. I have turned on the USB2 emulation in the bios but it didn’t help at all. My X-52 joystick and throttle also don’t work at all. PC keeps disconnecting from it and I get an invalid usb device in hardware manager. I fear a lot of my old hardware is just not moving up to the new stuff. I have been able to get my chproducts pedals and flight yoke to work but that was a challenge as well. Pretty sad really. I have not flown much since my old computer died as I have nothing but hardware trouble.
April 29, 2020 at 8:21 pm
Hi! Great tutorial…But All my panels (radio, aut pilot and switchers)..works great with P3Dv5…I just made some changes in regedit to Radio module and about one file inside Prepar3Dv5 to Aut Pilot module !!
October 3, 2020 at 4:14 pm
Same problem here, the switching panel looks dead. But when I shorted the 4.7 uF condensator with the USB powered all LEDs turned green and the USB was detected again.
November 2, 2020 at 8:32 am
Hi Eric, thank you for this. I too have the full set of Saitek controls and have struggled for a long time to make them work properly. Now on FS2020, nothing works anymore and it may be because I powered my USB hub with the very wrong power supply and it’s the smell of burnt plastic that alerted me… I still love these panels though, so found your project and I will most likely do the same. Tired of crappy Saitek/Logi drivers. I will, however, add an MCP23017 to the arduino, so as to have extra pins for all the switches and LEDs. Any plans to do the same on the radio panel and autopilot? I will start with the switch panel as it is obvious, then will proceed with the TPM which should be reasonably easy too. I suspect radio and AP will be a bit more challenging.
November 2, 2020 at 9:25 am
Good luck, I started with the switch panel since it was pretty easy to do. Shouldn’t be hard to add the lights for the landing gear once you have the extra pins. The radio and autopilot panels have the display which I would guess can’t be driven by the arduino. I’d look at a pi for those two. Nice thing with the pi is you could make the panel wireless 🙂
Unfortunately for me once all of my gear stopped working I got really frustrated and recently trashed my simpit. I boxed everything up out of frustration. These devices just wouldn’t work on my new machine. I prefer flying with the hotas and wasn’t about to spend another 200+ on a new one. Maybe if some newer hardware comes out that is not super expensive I’ll get back into it.
November 26, 2020 at 6:12 am
I finally found the time to do it, but slightly differently. Instead of having the arduino behave as a keyboard, it is used as a joystick with many buttons and no axis. I have also used an MCP23017 for extra pins, so all the buttons are functional and so are the three LEDs, controllable independently and in both colours. For this to be used, however, I will need to write a bit of software to be able to get the status of the landing gears from the simulator. That will be for later, I will now focus on the TPM! Thanks for this brilliant simple idea.
November 27, 2020 at 1:45 pm
Great idea using it as a joystick. I had not thought of that. I’d recommend looking at my flightconnect software on github. It could be easily modified to do what you want and send the data to the arduino. The app pulls plane data from the simulator and sends it over the network.