Latest Project: Star Wars Astromech Droid
Back in December I was looking for the next project after the proton pack. I knew I wanted to build a robot but I wasn’t sure what I wanted to do. R2D2 seemed like a lot of work and then I found some files for Chopper from Star Wars Rebels. He’s a bit shorter than R2 and I wouldn’t have to worry about trying to replicate a perfect chrome dome. After a lot of reading and joining the astromech.net forums I started printing. All in all over 15 rolls of 2 pound filament was used. I did learn a few tricks to speed up the process.
Read more to see design videos, links to source code, stl’s for printing, and more
These big parts don’t have a ton of detail on them so I switched to a .6 nozzle on my printer which significantly decreased print time. I wanted to go to .8 but my printer was not able to keep up. If you want to print something like this I highly recommend going up in nozzle size.
The files for the dome, body, and legs already exist but they are from 2 different designers. This has left some things open to interpretation and tinkering. First thing I did was figure out the dome rotation. That ended up being pretty simple. I am using a 14 inch lazy susan bearing with a 3d printed gear system. This is working really nicely.
Around this time I decided to ditch the RC radio and switch to an xbox controller. The transition went pretty easily and I spent a lot of time designing the electronic system. Ultimately this is what I ended up going with. I have an arduino in the dome with a usb power source controlling a bunch of LED’s. The dome lights are completely automated and you can find the source code for that here:
https://github.com/CountDeMonet/ArduinoChopperDomeLighting

The body was a bit more complex. For the drive system I found a pair of Razor E100 electric scooters that I scavenged for the motors, chains, and drive wheels. I’m controlling those with a dimension engineering sabertooth motor controller connected to an arduino mega. The dome rotation is using a cytron motor controller connected to the same mega controlling a uxcell motor with a 3d printed pinion gear. For the audio I’m using the same chip I did in the proton pack. The Adafruit Audio FX board but this time it’s out to a lepy 808 audio amp driving 2 3 inch speakers. All of this is protected by circuit breakers and a 60 amp main cutoff switch. For the battery I’m using a 14.4v 10Ah battery. So far this is working very nicely.
There have been a number of challenges. The biggest was designing the drive system mounts. After a lot of work and tinkering I finally settled on a flat pack design using screws and spacers to hold everything together. It came out quite nice


Once the drive system was figured out I had to decide on how to mount everything inside chopper. I had a few design goals to meet. First I wanted the electronics to be removable so I can service it. I decided to mount everything on a sturdy piece of plywood in a vertical mount within the center of chopper. The rest of the design just flowed around that.


Then a bit of a setback occurred. Chopper uses a 6 inch caster for the center wheel and the mount that i had made was proving to be too weak for the job when printed in PLA and PETG. My printer can’t do ABS so I had to design a new center wheel mount. After a lot of tinkering I have designed the mount that can take the force and it’s been working awesome. I have made the mount available on Thingiverse


With all of the issues resolved it was time to test everything. Here is one of the first drive tests
And the audio test.
All of the code is for driving this is based off the Padawan 360 system. It’s been heavily modified by me for Chopper as it does not need all of the stuff R2 uses. That code can be found here:
https://github.com/CountDeMonet/ArduinoAstromechControlSystem
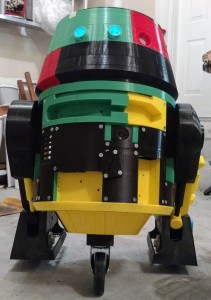
I’m currently in the finishing process for Chopper. This includes lots of bondo glazing putty, Rustoleum Automotive filler primer, and sanding. Tons and tons of sanding. I’m hoping to be ready to paint in the next month. Here is the current state of chopper…

